Blender Cats: A Complete Cat Modeling Guide
Learn how to model, texture, rig, and animate cats in Blender with practical steps, examples, and tips from BlendHowTo. This guide covers cat anatomy, blocking, sculpting, fur, shading, rigging, and animation.

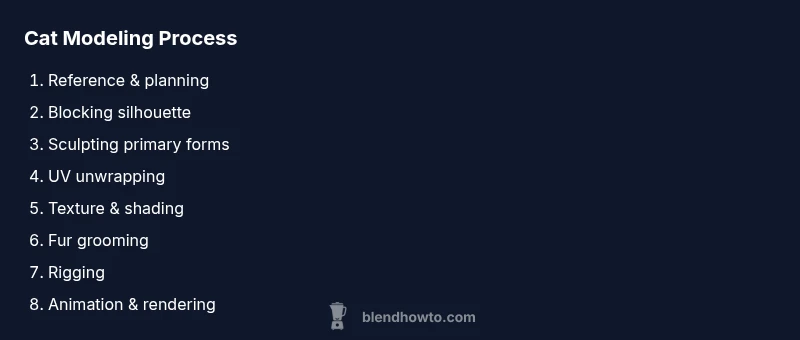
Blender cats are created entirely inside Blender, progressing from reference gathering to blocking, sculpting, UVs, textures, rigging, and animation. This workflow gives you a reusable pipeline for feline characters, whether you aim for stylized or realistic results. Start with references, block the silhouette, sculpt details, unwrap UVs, texture, shade, rig, and animate for convincing movement.
What blender cats are and why they captivate Blender artists
Blender cats are 3D cat models created entirely within Blender that can range from playful cartoons to photoreal felines. They provide a compact canvas to learn core CG techniques: anatomy, topology, shading, fur, rigging, and animation. For hobbyists and aspiring 3D artists, blender cats offer a forgiving but meaningful project to build a reusable pipeline. This material explains what makes these subjects compelling and how to approach them with a practical mindset. According to BlendHowTo, the best starters treat the cat as a series of linked systems rather than a single lump of geometry. Start with a simple silhouette, then refine with proportional checks, reference imagery, and a clear naming convention. As you progress, you’ll layer details such as facial features, paw structure, and tail articulation. The result is not just a pretty render; it’s a usable character ready for posing and animation.
Within the blender cats workflow, you’ll balance topology density, shader realism, and animation affordances to ensure your model remains flexible for future projects.
Planning and references for feline anatomy
Successful blender cats projects begin with strong planning. Gather multiple reference sheets showing side, front, and top views of the cat in poses you want to reproduce. Consider proportions for a realistic or a stylized outcome. BlendHowTo emphasizes starting with a rough skeleton plan and marking key landmarks (shoulders, hips, knee joints, ankle pivots) before any mesh is created. You’ll also want to study feline anatomy resources to understand muscle groups beneath fur and how the tail bones bend. Paying attention to paw pads and toe arrangement helps avoid uncanny results when you pose or animate. With a clear reference library, you’ll be able to check accuracy quickly at each stage and keep your topology efficient.
In addition to anatomy, decide on the fur style you want: short, medium, or long. Short-haired cats look very different in shading and shaping than long-haired breeds, so set expectations early. For a practical approach, build a few reference sheets for the cat’s breed or silhouette, then commit to a consistent proportional system for all subsequent steps.
Blocking the cat silhouette with primitives
Blocking establishes the overall shape and proportion before you dive into fine details. Start with simple primitives: a sphere for the head, a rounded box for the torso, cylinders for limbs, and a tapered cone for the tail. Position and scale these primitives to match your reference silhouette, ensuring the spine’s curve aligns with the pose you intend to animate. Avoid over-polishing at this stage; your goal is a clean, readable form that captures the cat’s stance. This phase also helps identify any proportional issues early, saving time later when you start sculpting. Blender’s mirror modifier is invaluable here, letting you model half the cat and symmetry handles the rest. Regularly compare your blocking to multiple reference angles to preserve fidelity.
Sculpting details and fur volume
Sculpting lets you refine the blocked form into a believable cat silhouette. Start with broad strokes: carve the skull shape, sharpen the snout, define the jawline, and shape the limbs. Move to mid-level details like muscle groups and paw contours, then sheathe fur volume by thinning or bulking areas to improve silhouette readability. When building fur volume, plan where the fur will naturally part or lay flat, which helps with shading later. Use a blend of Clay, Move, and Smooth brushes to maintain a natural transition between regions. Always frequently compare your sculpt with reference poses to avoid anatomical drift. After you’re happy with the major forms, you can bake or apply a dynamic remesh to keep topology clean for texturing.
UV mapping and texture strategy
UVs are the bridge between 3D geometry and texture detail. Unwrap the cat model using a combination of smart UVs and manual seam placement to preserve important features like the face and paws. Plan for fur textures by laying out long strips along the body and shorter runs on the face where detail matters most. When painting textures, start with a neutral base color and then layer patterns (tabby stripes, calico patches, or solid coats) using texture paint or image textures. If you aim for realistic fur shading, you’ll rely on a dedicated fur shading workflow rather than flat color, so set up a separate texture map for base color, roughness, and normal maps. A well-planned UV map reduces texture stretching and yields crisper fur features.
Shading and fur rendering
Shading determines how the cat’s fur and skin respond to light. Start with a sexually neutral skin/shading base using the Principled BSDF for the body and a separate shader for the eyes. For fur, explore hair shaders or particle hair systems to simulate strands. In Cycles, enable hair rendering and use light energy to control the gloss and translucency in the fur. For stylized visuals, you can exaggerate fur length and color transitions to enhance personality; for realism, reduce clipping and ensure color variations along the body follow natural gradient patterns. Use a few test renders with different lighting to validate your shading under various conditions.
BlendHowTo recommends building your shader network in stages: skin undercoat, mid-length guard hairs, and the longest guard fibers. This layered approach yields richer, believable fur.
Fur grooming with particle systems
Grooming fur with particle systems gives you control over density, length, and direction. Create a base hair particle system on the torso, head, and tail with different strand lengths to mimic natural variation. Grooming tools let you comb, cut, and clump hairs into groups—use this to emphasize the cat’s natural flow around the cheeks, chest, and tail. Don’t forget about the undercoat; adding a subtle layer beneath the main fur improves realism and shading accuracy. For performance, start with a lower particle count during blocking and gradually increase as you finalize shading and lighting. Real-time previews help you iterate quickly on density and direction.
Rigging: skeleton, controls, and constraints
Rigging gives your blender cats life through a controlled skeleton and animation controllers. Start with a spine setup that allows bending and torsion, then add limb bones for the legs and a separate tail chain with extra joints for flexibility. Use IK for legs and a spline IK for the tail to achieve natural movement. Add control bones for the head, ears, and jaw to enable expressive posing. Weight painting should be clean and intuitive, especially around joints and the shoulders. Test the rig with simple poses early, then refine deformations during later steps. A practical rig supports both static poses and short animation cycles.
This approach ensures your cat can walk, pounce, and react to environments convincingly while remaining animatable.
Animation: walk cycle, tail and ears
Animation is where all your earlier work pays off. Start with a basic walk cycle that emphasizes weight transfer, paw placement, and subtle tail swish. Add secondary motion to the ears and whiskers to convey expression and intent. Break movement into cycles: contact, passing, and up positions for the legs, then loop for a seamless gait. Use shape keys or drivers for facial expressions if you aim for character-driven animation. Test on different lighting and backgrounds to verify that motion reads naturally in scenes similar to your planned uses. A well-crafted walk cycle can sell believability even if the fur hasn’t reached full realism yet.
Lighting, rendering, and post-processing
Lighting dramatically affects how convincing a blender cat model appears. Study three-point lighting and adjust color temperature to suit the mood, whether playful, photoreal, or stylized. For fur, Cycles tends to yield more realistic results; Eevee can be used for real-time previews with appropriate shadow settings. Render passes should include ambient occlusion, depth of field, and a subtle global illumination pass to enrich the fur’s depth. Post-processing in the compositor offers color grading and subtle fur glow adjustments without altering the shader setup. Always render test frames in different resolutions to confirm fidelity before final output.
Authority sources and recommended readings
For feline anatomy and reference material, consult credible sources to inform your cat modeling workflow. National Geographic’s cat overview provides broad anatomical context and behavior insights: https://www.nationalgeographic.com/animals/mammals/facts/cat. Britannica’s cat article offers concise, authoritative anatomical notes: https://www.britannica.com/animal/cat. MIT OpenCourseWare can help you understand general 3D modeling workflows and digital sculpture concepts: https://ocw.mit.edu. Incorporating these references helps you ground your Blender Cats project in established knowledge and best practices.
Next steps and practice plan
To consolidate learning, pick a single cat reference and work through the entire pipeline in a single session: blocking, sculpting, UVs, shading, fur, rigging, and a short animation. Create a checklist for each stage and mark off items as you complete them to maintain momentum. Schedule incremental milestones, such as “week 1: blocking and UVs,” “week 2: shading and fur,” and “week 3: rigging and animation.” Build a small portfolio of at least two cat models with different poses or fur patterns to showcase your progress. Finally, rotate back to earlier stages to improve topology or shading with new techniques you’ve learned.
Reference notes for readers
This guide centers on a practical, iterative workflow. If you are new to Blender, start with beginner-friendly tutorials to get comfortable with blocking and basic sculpting before attempting fur and advanced rigging. If you are more experienced, experiment with advanced shading networks, motion capture tweaks for tails, and non-photorealistic fur styles to broaden your capabilities. The blender cats project is a rich, multidisciplinary exercise that reinforces modeling, texturing, rigging, and animation fundamentals.
Authority sources
- National Geographic: Cat facts and overview: https://www.nationalgeographic.com/animals/mammals/facts/cat
- Britannica: Cat overview and anatomy: https://www.britannica.com/animal/cat
- MIT OpenCourseWare: General 3D modeling and sculpture concepts: https://ocw.mit.edu
Tools & Materials
- Blender software (latest stable release)(Includes Sculpt, UV, shading, and hair systems)
- High-resolution cat reference images(Front, side, and top views; multiple breeds if desired)
- Graphics tablet or stylus(Helpful for sculpting and fine detail)
- External storage for backups(Regularly back up your projects)
- Calibrated monitor and color reference(Helps maintain color consistency in textures)
Steps
Estimated time: 6-12 hours
- 1
Gather references and plan proportions
Collect side, front, and top views of the cat you want to model. Create a quick reference board and note essential proportions (head-to-body ratio, limb lengths, tail curvature). This foundational step guides all subsequent decisions and ensures consistency across the project.
Tip: Keep a simple ruler or measurement in your reference to compare limb lengths. - 2
Block in the rough silhouette
Create a basic head, torso, limbs, and tail using simple primitives. Position them to match the reference pose and ensure the overall silhouette is readable from multiple angles. Use symmetry to speed up work but plan seams where asymmetry will appear in fur or pose.
Tip: Enable the mirror modifier to speed up blocking and keep proportions consistent. - 3
Refine anatomy and pose
Adjust joints and bone placements to reflect natural feline anatomy. Pose the model into a natural stance that suits your intended animation (standing, walking, or sitting). This stage focuses on avoiding obvious anatomical errors that will be hard to fix later.
Tip: Cross-check with reference images from different angles for accuracy. - 4
Sculpt primary forms
Sculpt the major mass around the skull, chest, hips, and limbs. Work from general shapes toward nuanced anatomy, preserving clean topology for future deformers. Periodically apply subdivisions to test how the mesh behaves under smoothing.
Tip: Use a low subdivision level early to diagnose proportions before adding detail. - 5
Detail face and paws
Add facial features, ear contour, and paw structure. Fine-tune the eyes, nose, mouth, and whisker area to create character. Sharpen paw pads for realism and consider slight asymmetry to avoid a too-perfect look.
Tip: Iterate with reference sheets to capture unique facial expressions. - 6
Unwrap UVs and plan fur textures
Unwrap the mesh with sensible seams around the head, chest, and legs. Plan texture resolution and how fur patterns align with anatomical features. Create base textures for color, roughness, and an optional normal map.
Tip: Mark seams where fur tension would naturally occur (neck, joints). - 7
Paint textures and set up shading
Paint base colors and add color variations across the coat. Build a shading network that layers base color, subsurface scattering for skin hints, and a dedicated fur layer. Test with different lighting to verify realism.
Tip: Keep a separate base color texture file to allow non-destructive edits. - 8
Add fur with particle systems
Create hair particles for the coat with varying strand length and density. Groom hair direction following the Cat’s anatomy, ensuring natural fall and flow. Add undercoat density to improve depth and shading.
Tip: Start with a lower hair count for faster iterations; increase it as you refine shading. - 9
Rig or pose for animation
Build a skeleton: spine, limbs, tail, and a head rig. Use IK for legs and a flexible tail chain. Weight paint carefully to ensure natural bending without distortions, then test several poses.
Tip: Test with a simple pose first to identify deformation hotspots. - 10
Animate walk cycle and render
Create a short walk cycle with subtle tail and ear motion. Run test renders under varied lighting to ensure fur reads well. Do quick color and exposure checks to avoid excessive post-processing.
Tip: Render in passes (diffuse, shadow, specular, fur) to simplify post-processing.
Frequently Asked Questions
Do I need sculpting to model a cat in Blender?
Sculpting helps achieve finer detail and smooth surfaces, but you can start with blocking and texture-based approaches. Sculpting is often used in later stages to refine anatomy and fur. Begin with a simple block model and add details as you gain confidence.
Sculpting is helpful but not strictly required; start with blocking and add detail later.
What bone setup is ideal for a cat's rig?
A practical cat rig uses a spine with controllable ribs, IK for legs, a tail chain with flexibility, and a head rig for expressions. Separate controls for ears and jaw improve expressiveness. Ensure weight painting supports natural bending around joints.
Use a spine, leg IK, tail chain, and a controllable head rig for expression.
Which rendering engine is best for fur?
Cycles generally yields more realistic fur with physically based shading, while Eevee can handle look-dev previews effectively. Use Cycles for final renders and Eevee for faster previews during iteration.
Cycles is best for realistic fur; Eevee is great for quick previews.
How long does it take a beginner to model a cat?
Time varies by prior experience, but a structured practice plan usually spans several sessions over days to weeks. Start with blocking and UVs, then gradually add fur and rigging as you build confidence.
It depends on your pace, but plan for a few sessions to build fundamentals.
Can I reuse cat models for animation loops?
Yes. With a solid rig and consistent topology, you can reuse the same model across multiple animations by tweaking poses and weights. Save different action presets to streamline workflow.
Yes, reuse with a good rig and clean topology.
Where can I learn more about Blender fur systems?
Consult the official Blender docs and reputable tutorials. The Blender manual covers particle hair and shading workflows; seek extended guidance from curated tutorials for fur realism.
Check the official Blender docs for fur workflows and curated tutorials.
Watch Video
What to Remember
- Plan anatomy before sculpting to avoid major rebuilds
- Block first, then refine details to preserve topology
- UVs and textures should follow the coat direction and patterns
- Hair systems are essential for realistic fur and responsive shading
- Rigging enables believable animation and reuse in scenes