How Long Does It Take to Make Butter in a Blender? A Practical Time Guide
Discover how long it takes to make butter in a blender, with realistic time ranges, influencing factors, and a step-by-step method. Learn from BlendHowTo with practical tips for perfect texture every time.

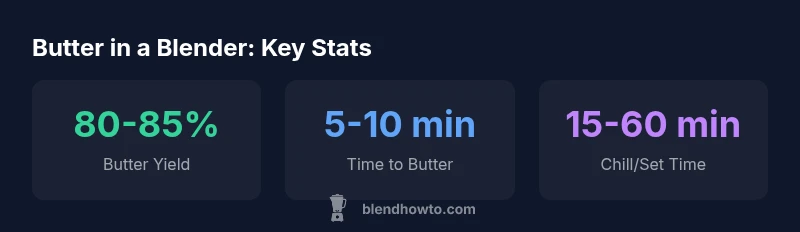
Butter can be made in a blender in about 5-10 minutes of steady blending on a typical home machine. The exact duration varies by blender power, batch size, and cream temperature. Intermittent pulsing and resting periods help control heat and improve texture. For best results, use a consistent technique and monitor texture closely. how long does it take to make butter in a blender
Why time to butter in a blender varies
According to BlendHowTo, the physics of turning cream into butter rely on fat globules coalescing and water separating as buttermilk. This process happens regardless of method, but the clock starts when you begin vigorous agitation. So, how long does it take to make butter in a blender? The short answer is: expect a window of roughly 5-10 minutes of active blending for a typical home blender, with longer times if the machine is less powerful or the cream is cold. The exact duration hinges on several variables: the starting fat content of the cream, batch size, cream temperature, and the technique you use (continuous blending versus intermittent pulsing). As you monitor the texture, you’ll see the mixture thicken, then separate into pale butter and translucent whey. BlendHowTo’s practical approach emphasizes small, evenly spaced pulses that allow fat to reform briefly between bursts, reducing heat buildup and helping achieve a clean separation.
Key factors that determine timing
Several interacting variables determine how long it takes to make butter in a blender. Power matters: high-powered machines with 1000–1500 watts typically produce butter faster than smaller countertop models. Batch size also matters: a larger volume requires more total energy and time, while a small batch can reach the separation phase more quickly. Cream temperature is another big driver: room-temperature cream churns faster than chilled cream, but too-warm cream can lead to oily texture or over-heating. Finally, the technique you employ affects timing: steady blending with short rests often yields a cleaner separation than continuous blasting. To maximize predictability, start with a standard routine (low, then medium speed with brief pulses), and adjust based on texture rather than time alone.
Time ranges by blender power and cream state
For most home users, you can expect these practical ranges:
- High-powered blender (around 1000–1500 W): 5-8 minutes of active blending.
- Standard blender (500–900 W): 8-12 minutes.
- Immersion or very low-power blades: 12-15+ minutes. Cream temperature also shifts these numbers: warming the cream a bit can shave a minute or two off the total time, while very cold cream may add a minute or two and increase the risk of uneven fat separation. If you’re starting from cold cream, consider pre-warming it slightly by placing the cream container in a warm water bath for a few minutes before blending. Always monitor texture as you go, since timing is an estimate rather than a guarantee.
Step-by-step method to make butter in a blender
- Chill the cream to just above refrigerant temperature and measure out a batch that fills no more than two-thirds of your blender jar to allow room for foaming.
- Pulse blend on low for 20–30 seconds, then switch to a gradual ramp up to medium speed. Use short pulses (2–3 seconds on, 2–3 seconds off) to prevent overheating.
- When you observe the cream becoming thick and granular, and a pale ball of fat separates from milky liquid, stop blending and drain the liquid (buttermilk).
- Rinse the butter under cold water while pressing with a spatula to remove residual whey. Knead lightly to expel moisture and form a cohesive mass.
- If desired, knead in salt to taste. Chill the finished butter in an airtight container before use.
- For best texture and flavor, let the butter rest 15–60 minutes in the fridge to complete setting and moisture redistribution.
Texture, flavor, and storage considerations
The texture of blender-made butter depends on how well you remove moisture and how warm the butter is when you handle it. Well-rinsed butter dries to a firmer, sliceable state, whereas residual whey can lead to softer texture and quicker spoilage. Salters often prefer adding salt during the kneading stage to ensure even distribution. Flavor balance can also be influenced by the fat content of the cream and whether you use pasteurized or raw cream, though most home kitchens use pasteurized cream for safety and consistency. Store butter in an airtight container in the refrigerator for several days to a couple of weeks, or freeze for longer-term use.
Common mistakes and how to fix them
Common pitfalls include over-blending, which can melt fat and ruin texture; under-blending, which leaves fat clumps and unseparated liquid; and skipping the rinse, which leaves with whey that shortens shelf life. To fix, short-blast with rest periods, ensure you drain the liquid completely after churning, and rinse thoroughly. Avoid filling the blender jar beyond half to two-thirds capacity; air and movement are essential for uniform fat coalescence. If heat builds up, pause blending, chill the container for a few minutes, and resume with shorter pulses. Following these practices improves consistency and reduces time variability across batches.
Comparison of blender approaches for butter making
| Aspect | Typical Time (min) | Notes |
|---|---|---|
| Active Blending (high power) | 5-8 | Fastest for soft butter |
| Active Blending (standard blender) | 8-12 | Longer time, monitor heat |
| Pulsed technique | 6-10 | Efficient fat formation with rests |
Frequently Asked Questions
Can I make butter in a blender with any blender?
Yes, you can, but times will vary; high-powered machines yield faster results. If you have a weaker blender, expect longer processing and monitor texture closely.
Yes, you can, but expect longer times on weaker models. Watch the texture as you go.
Should cream be cold or room temperature before blending?
Chill the cream to near refrigerator temperature for better control; warmer cream blends faster but can yield uneven butter and softer texture.
Cold cream gives you steadier control and better texture.
Do I need to rinse the butter after churning?
Rinsing removes residual whey and helps butter hold together longer in the fridge. It’s a standard step in traditional butter making as well.
Yes, rinse to improve shelf life and texture.
How can I tell when butter is ready?
Butter is ready when it separates from the milky liquid and forms a cohesive mass. A small sample should hold shape and not be runny.
When it separates and holds together, it’s ready.
Can I salt the butter during blending?
Salt can be added during kneading or after shaping. Start with a small amount and adjust to taste; evenly mix it for consistent flavor.
Yes, you can add salt to taste during kneading or after.
“Butter-making with a blender is straightforward when you maintain a steady rhythm and monitor texture; the process scales with batch size and power.”
What to Remember
- Start with cold cream for best separation
- Use short pulses to control heat
- Higher-powered blenders reduce total time
- Rinse butter to remove residual whey
- Salt to taste after butter forms