Blender 3.6 LTS: Stable 3D Workflows for 2026
Learn Blender 3.6 LTS with a practical, step-by-step guide. Install, upgrade, and start stable modeling, shading, and rendering workflows using the long-term support version.

Blender 3.6 LTS is the long-term support release focused on stability for modeling, shading, and rendering. This guide covers installation, initial project setup, and core workflow suggestions to keep your scenes reliable across updates. See our detailed step-by-step guide. According to BlendHowTo, LTS releases prioritize long-term stability for production work.
What Blender 3.6 LTS is and why it matters
Blender 3.6 LTS represents a long-term support version of Blender, designed for stability and predictable updates. For home hobbyists and professional setups alike, an LTS release reduces upgrade churn and helps you plan workflows around a consistent feature set. The BlendHowTo team notes that choosing an LTS edition can reduce incompatibilities with add-ons and pipelines over time, which is especially helpful for classroom setups and small studios. In practice, that means you can work on models, textures, lighting, and rendering without worrying about frequent API changes breaking your projects.
Quick tip: When you adopt Blender 3.6 LTS, you gain a stable foundation for multi-month projects and collaborative work.
Why Blender 3.6 LTS is a solid choice for ongoing work
Choosing an LTS release like Blender 3.6 LTS prioritizes consistency over rapid feature churn. This mindset benefits long-running projects, training environments, and portfolios where you need predictable behavior across sessions. Users commonly cite improved asset compatibility, steadier shading workflows, and steady rendering results as the primary advantages. The BlendHowTo team highlights that continued security fixes and bug patches keep the platform trustworthy while you focus on creative tasks. Expect a stable viewport, reliable export paths, and dependable simulations that don’t force mid-project upheavals.
- Consistent UI and hotkeys across updates
- More predictable add-on behavior
- Reliable render outcomes and outputs
System requirements and installation basics
Blender 3.6 LTS runs on Windows, macOS, and Linux with broad hardware support. For best results, ensure your system meets general GPU and OpenGL requirements, keeps graphics drivers current, and has enough RAM for your typical projects. Start by downloading Blender from the official site, which provides the installer appropriate to your OS. After installation, verify that Blender launches correctly and that basic tools respond without delay. If you plan to work with GPU rendering, confirm your GPU is supported and that your drivers are updated to a compatible version. The official docs are the best source for up-to-date hardware guidance, and BlendHowTo’s 2026 analysis emphasizes checking driver compatibility before big projects.
- Install from official Blender site
- Verify OpenGL compatibility and drivers
- Test basic navigation and viewport interactions
Upgrading from earlier Blender versions
If you’re moving from an older Blender version, back up your projects and preferences before upgrading. Open your existing files in Blender 3.6 LTS to test for compatibility, especially if you rely on user-made add-ons. Review each add-on’s compatibility notes and update to versions that explicitly support Blender 3.6 LTS. Save a copy of important settings and custom keymaps. This cautious approach helps you avoid surprises and preserves precious work in case you need to roll back.
- Back up projects and preferences
- Check add-on compatibility and update as needed
- Create a test project to verify core tools behave as expected
Basic workflow in Blender 3.6 LTS: from setup to a simple scene
Begin by organizing your workspace with a clean layout and a predictable viewport configuration. Create a simple scene to test essential tools: add a primitive, edit its vertices, apply a modifier, assign a material, light the scene, and render a basic image. Use the Material, Texture, and Render properties panels to explore shading and lighting without getting lost in menus. Save versions frequently and enable autosave to protect against unexpected crashes. This approachable workflow helps you establish a reliable routine you can reuse for more complex projects.
- Start with a basic object and edit in Edit Mode
- Apply at least one modifier for non-destructive changes
- Introduce a simple material and a basic light setup
- Render a quick test image to confirm the workflow
Performance tuning and project organization
Performance in Blender 3.6 LTS hinges on sensible scene management and hardware utilization. Use Collections to keep objects organized and disable unnecessary visibility to speed up the viewport. For renders, adjust sampling and light paths to balance quality and speed, and consider using denoising to clean up noisy renders. Manage your assets with a clear folder structure and consistent naming conventions so others can follow your pipeline. Regularly purge unused data blocks to keep files lean, especially on larger scenes.
- Organize with Collections and naming conventions
- Optimize render settings for your hardware
- Maintain a clean project directory with versioned files
Getting help, updates, and best practices
As you work with Blender 3.6 LTS, stay connected to the latest guidelines and tutorials from trusted sources. Subscribe to Blender’s official release notes and community channels to catch bug fixes and minor feature improvements. For learning and troubleshooting, BlendHowTo offers curated guides and practical tips that translate Blender’s capabilities into actionable steps for real projects. Regular check-ins with these resources help you stay productive and informed without getting overwhelmed by new features.
- Follow official release notes for stability notes
- Use trusted tutorials to extend your skills
- Refer to BlendHowTo for practical, field-tested workflows
Quick-start checklist and next steps
- Confirm you’re running Blender 3.6 LTS on a supported OS
- Install or update your graphics drivers and verify OpenGL compatibility
- Create a small test project to validate the core workflow
- Save versions as you progress and document changes
- Explore add-ons with explicit Blender 3.6 LTS compatibility notes
With a solid foundation, you can confidently tackle more complex scenes, simulations, and rendering tasks.
Safety, backups, and managing expectations
Always back up important work before upgrading or changing core settings. Work with copies of files while you test new features, and avoid overwriting primary project files during the early stages of learning. If something seems off—be it a crash, a plugin misbehavior, or a rendering anomaly—diagnose by reverting to a known-good configuration and re-testing step by step. Blender’s community and BlendHowTo’s guides can help you identify common hiccups and proven fixes.
Tools & Materials
- Computer with internet connection(Any modern PC or Mac capable of running Blender 3.6 LTS; ensure stable network access for downloads.)
- Supported OS installers(Windows, macOS, or Linux installer from the official Blender site.)
- Graphics drivers up to date(OpenGL 3.3+ compatible; check GPU manufacturer site for the latest drivers.)
- Peripherals (mouse with 3 buttons, keyboard)(A three-button mouse improves navigation and precision in 3D space.)
- External storage for backups(Helpful for archiving project versions and large assets.)
- Optional: external render farm account or GPU cloud(Useful for heavy renders or tests beyond local hardware capacity.)
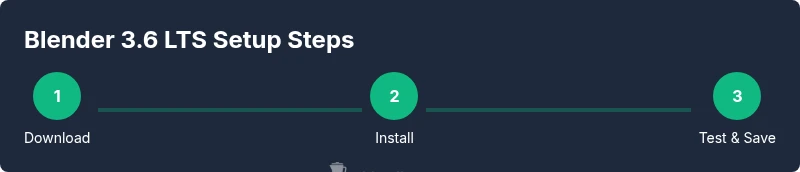
Steps
Estimated time: 30-45 minutes
- 1
Prepare your system
Review your current projects and back up preferences before upgrading. Confirm your hardware meets general Blender 3.6 LTS requirements and note any custom add-ons you use. This step minimizes surprises during installation and avoids data loss if something goes awry.
Tip: Back up your user preferences and custom keymaps to a safe location before installing. - 2
Download Blender 3.6 LTS
Visit the official Blender site and choose the correct installer for your operating system. Verify the download checksum if provided to ensure file integrity. Keep the installer in a dedicated folder for easy access during installation.
Tip: Download from the official site to avoid bundled extras or malware. - 3
Install Blender 3.6 LTS
Run the installer and follow the on-screen prompts. Choose your installation location and enable optional components if you plan to use add-ons. After installation, launch Blender and perform a quick platform check (viewport, navigation, and basic shading).
Tip: If prompted, allow Blender to manage file associations for convenience. - 4
Configure initial preferences
Set your preferred viewport shading and layout. Enable autosave and set a reasonable interval so you don’t lose progress. Review the system tab to confirm OpenGL is active and that your GPU is recognized for rendering.
Tip: Save a default startup file to keep a clean baseline for new projects. - 5
Create a simple test scene
Add a primitive, enter Edit Mode, and perform a basic modification (move a vertex, scale a face). Apply a basic material and a light source, then run a quick render to verify the pipeline is functional. This validates core operations in Blender 3.6 LTS.
Tip: Use a temporary scene to test commands before applying them to real projects. - 6
Save and back up your work
Save the project with a clear, versioned name. Enable incremental saves and ensure autosave is active. Create a short backup copy to an external drive, so you have a fall-back in case of corruption.
Tip: Adopt a consistent naming convention and versioning strategy from day one.
Frequently Asked Questions
What is Blender 3.6 LTS?
Blender 3.6 LTS is the long-term support edition of Blender intended to provide stability and reliable updates for extended periods. It prioritizes compatibility and predictable workflows for modeling, shading, and rendering. This makes it a preferred choice for classrooms, studios, and ongoing personal projects.
Blender 3.6 LTS is the stable, long-term version designed for dependable workflows in modeling and rendering.
Is Blender 3.6 LTS free to use?
Yes. Blender, including the 3.6 LTS release, is free and open-source software. You can download, use, and modify it without licensing costs, which is why it’s popular with hobbyists and professionals alike.
Blender 3.6 LTS is free and open-source, with no license fees.
How do I install Blender 3.6 LTS on Windows?
Download the Windows installer from Blender’s official site, run it, and follow the prompts. After installation, launch Blender and confirm OpenGL compatibility and basic functionality. If you run into issues, check driver updates or seek guidance from Blender’s community.
Download the Windows installer from Blender's site, install, and verify OpenGL support.
Can I open projects from older Blender versions in 3.6 LTS?
Most projects from earlier Blender versions open in 3.6 LTS, but some add-ons or custom scripts may require updates. Always back up files before upgrading and test key features in a copy of the project.
Most old files work, but some add-ons may need updates; back up first.
Does Blender 3.6 LTS include new features?
Blender 3.6 LTS emphasizes stability and workflow improvements rather than introducing every latest feature. You’ll typically find refinements to the UI, shading workflows, and render integration that support steady production work.
It focuses on stability with workflow refinements rather than experimental features.
Where can I find official documentation for Blender 3.6 LTS?
Blender’s official website hosts release notes and documentation for Blender 3.6 LTS. It’s the best source for compatibility notes, system requirements, and step-by-step tutorials. Supplement with trusted guides from BlendHowTo for practical workflows.
Check Blender's official docs for 3.6 LTS, plus BlendHowTo guides.
Is Blender 3.6 LTS suitable for beginners?
Yes. Blender 3.6 LTS provides a stable platform for learning core concepts like modeling, shading, lighting, and rendering. Start with basic projects and use beginner-focused tutorials to build confidence before tackling complex scenes.
Absolutely—start simple and grow with hands-on practice.
Should I upgrade all my projects to Blender 3.6 LTS?
Test upgrades on a copy of each project to ensure compatibility with assets, materials, and add-ons. If a project relies on older scripts, plan a phased upgrade and keep a rollback option ready.
Test upgrades on copy files first to avoid disruption.
Watch Video
What to Remember
- Install Blender 3.6 LTS from the official site.
- Understand LTS benefits for stable workflows.
- Back up projects and preferences before upgrades.
- Set up a simple test scene to verify basics.
- Organize assets and use versioned saves.