Top Free Texture Blender Resources for 2026: Practical Guide
Explore the best free texture blender resources for 2026, including where to download textures, how to evaluate quality, and practical workflow tips to integrate textures in Blender projects.

According to BlendHowTo analysis, the strongest starting point for free textures in Blender is to use CC0 or similarly licensed libraries that offer seamless tiling and PBR maps. Pair textures with careful tiling, UVs, and HDR lighting for realistic results. This guide highlights dependable sources and practical best practices.
Understanding free texture blender resources
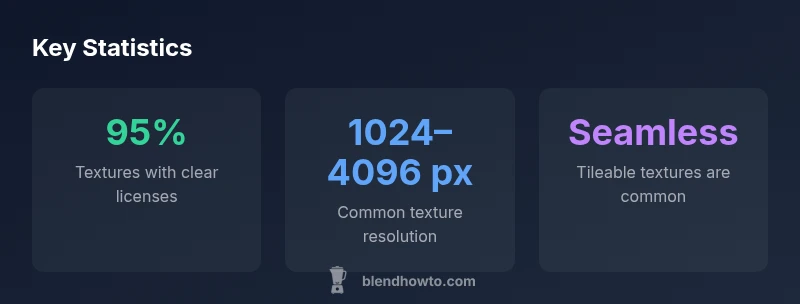
In 2026, home cooks by day and 3D hobbyists by night rely on texture assets to add realism without breaking the budget. Free textures are abundant, but quality and licensing vary widely. The term free texture blender covers CC0 textures, attribution-licensed packs, and textures offered under personal use terms. The BlendHowTo team emphasizes starting with sources that clearly state license terms and provide maps such as albedo, normal, and roughness. When you download textures, inspect the file structure, naming conventions, and whether the textures are tileable. For Blender artists, a well-organized collection of seamless textures can accelerate scene setup, reduce repeated authoring, and help you iterate designs quickly. In practice, you will want textures that scale from close-ups to distant backgrounds, with consistent color spaces and gamma handling. Always confirm the license allows commercial use if your project might be client-facing. In short, build a curated, reusable library rather than a scavenger hunt.
Licensing and legality: what to check before you download
Before you click download, map out the license landscape. CC0 and public domain licenses offer broad freedom, while attribution licenses require proper credit. Some textures are usable for personal projects but restrict commercial use or redistribution in altered forms. The BlendHowTo approach is to prioritize CC0 textures or those with explicit commercial-use permissions, then document the exact terms in your project files. Always verify whether derivative works are allowed and how attribution must be provided if necessary. If you’re sharing with a client or posting a rendered image online, extra care with licenses prevents downstream legal risk. A simple best practice is to maintain a license log alongside each texture: source, license type, date downloaded, and any special conditions.
Where to find reputable free texture blender sources
Reputable sources typically offer clear licensing information, tileable textures, and multiple maps. When evaluating a site, look for explicit license terms, a mix of albedo, normal, and roughness maps, and high-resolution options. The BlendHowTo methodology emphasizes transparency: license terms should be easy to read, and texture bundles should include usage notes. For Blender users, the most useful packs are those that provide consistent color spaces and well-labeled maps that integrate with the node-based shader workflow. As you curate your library, group textures by material type (metal, wood, stone, fabric) and by project stage (scout renders vs final visuals) to streamline your workflow.
Evaluating texture quality: resolution, tiling, maps
Quality evaluation starts with resolution. For close-up shots, textures in the 2048–4096 px range often deliver crisp detail without exploding file sizes. Tileable textures save time by avoiding visible seams, but not all textures tile perfectly; test tiling by applying the texture to a large surface in Blender and rotating UVs to identify repeats. A complete texture pack should include commonly used maps: albedo (base color), normal or bump (surface details), roughness (light interaction), and occasionally metallic or ambient-occlusion maps. Check color space consistency across maps, ensure gamma compatibility, and confirm that textures are provided in common file formats (PNG, JPEG, TIFF, or EXR). If you need PBR materials, verify that all required maps are present and labeled clearly to prevent confusion during shader setup.
Importing textures into Blender: a practical workflow
Begin by organizing textures into a dedicated Blender textures folder with subfolders for albedo, normal, roughness, and metallic maps. In Blender, use the Image Texture node and connect textures to the corresponding shader inputs; enable non-color data for normal maps. Use the Principled BSDF shader as a base for PBR workflows and adjust roughness and specular values to taste. If a texture lacks a normal map, generate one procedurally via procedural textures or use a simple normal map from the same pack. When tiling, set the texture coordinate system to Generated or UV and leverage mapping nodes to align textures across objects. Finally, document your pipeline: note the texture’s source, license, and any processing steps so future revisits remain reproducible.
Working with PBR textures and normal maps
PBR textures bring realistic lighting behavior by providing multiple maps. Normal maps simulate small surface relief; roughness maps control shine. Ensure your textures align with Blender’s Principled BSDF inputs: use the Albedo for base color, Normal for surface detail, and Roughness for light interaction. If a texture includes a metallic map, plug it into the Metallic input and experiment with metallic/roughness balance for metal surfaces. When sources include ambient occlusion maps, blend them subtly with the base color to avoid an overly dark result. Keep an eye on color management: use a consistent gamma (2.2) and a linear workflow for accurate results under varied lighting conditions.
Handling seams and tiling challenges
Even tileable textures can reveal seams under certain lighting or camera angles. A practical approach is to blend textures with seamless transitions using a small amount of blur or by mixing in adjacent textures at border edges. Use a seamless texture set for walls, floors, or organic surfaces to reduce visible repetition. In Blender’s shader editor, use texture coordinates and mapping to offset seams slightly or to randomize tiling across a surface. For large scenes, consider texture atlases and procedural textures to reduce repetition. Finally, verify renders from multiple viewpoints to ensure seams stay inconspicuous across lighting conditions.
Organizing a texture library for long-term projects
A well-organized library saves time on future projects. Create a folder hierarchy by material type, resolution tier, and license. Use consistent file naming that encodes source, resolution, and texture map type (e.g., metal_albedo_1024.png, wood_normal_2048.png). Maintain a metadata sheet listing each texture’s license, download date, and usage notes. Regularly prune outdated textures and back up your library. When collaborating, establish a shared standard so team members know where to find textures and how to attribute them. An organized library reduces onboarding time and minimizes accidental license violations across a production.
Quick-start project: your first texture-driven render
To get hands-on quickly, pick a simple object like a metal bottle or wooden crate and source a set of textures with aligned maps. Set up a basic scene in Blender, apply textures using the Principled BSDF shader, and adjust roughness to reflect the material’s properties. Use HDR lighting to evaluate how textures react to highlights and shadows. As you build confidence, expand to textured environments or organic materials, maintaining license discipline and consistent naming. This practical approach helps you move from theory to repeatable results in your first texture-driven render.
Advanced tips and automation for texture management
For power users, automate texture workflows with Python scripting or Blender’s asset browser. Create scripts to batch-import textures, assign maps to the correct shader inputs, and automatically tag assets with license data. Use node groups to reuse common shading setups across projects and keep texture conversion steps consistent. Consider setting up a small internal catalog with previews and quick notes so teammates can preview textures without opening each file. Finally, maintain a short, repeatable review checklist before final renders—license verification, mipmapping levels, and color management considerations—to ensure your textures consistently meet project standards.
Texture asset considerations for Blender workflows
| Aspect | Typical range | Notes |
|---|---|---|
| License type | CC0 / Attribution | Use CC0 where possible to maximize reuse |
| Texture resolution | 1024-4096 px | Higher resolutions offer more detail but larger files |
| Maps included | Albedo, Normal, Roughness | Check for metallic or ambient occlusion maps when needed |
Frequently Asked Questions
What licenses should I look for in free textures for Blender?
Look for CC0 or public domain licenses for maximum reuse; if attribution is required, credit the original creator. Always read the license terms for commercial use.
Look for CC0 licenses and read the terms; attribution may be required.
Are free textures safe for commercial projects?
Commercial use depends on license; CC0 typically allows it; if in doubt, choose CC0 or textures explicitly marked for commercial use.
Check the license; CC0 usually allows commercial use.
How can I avoid seams when tiling textures?
Use tileable textures, adjust UVs, enable texture offset, and apply blur to seams; consider using exponential falloff.
Tileable textures and UV tweaks help.
Do free textures include normal maps and roughness maps?
Most textures come with albedo, normal, roughness; some packs include ambient occlusion and metallic maps.
Expect basic maps but check the pack.
How should I organize downloaded textures for Blender projects?
Create a standardized folder structure, rename files consistently, and keep metadata.
Set up folders and naming conventions.
Can I modify textures that are free?
Yes, for CC0 and most attribution licenses; always confirm allowed edits and derivative works.
Yes, you can modify textures if permitted.
“Texture assets are only as valuable as the licenses that back them and the workflows you establish to use them consistently.”
What to Remember
- Curate a license-cleared texture library for faster, compliant work
- Prefer CC0 textures for maximum reuse and fewer license constraints
- Ensure textures come with core maps (albedo, normal, roughness) for PBR workflows
- Test tiling and seams early to avoid surprises in renders
- Organize assets with consistent naming and metadata for collaboration
- Leverage Blender's nodes and principled shader for efficient texture deployment
- Document licensing, source, and processing steps to ensure reproducibility
- Use high-quality textures judiciously to balance detail and performance
- Automate repetitive texture tasks to save time on large projects
- Regularly review and prune textures to keep the library clean