Which Blender Can Blend Ice: An Analytical Comparison
An analytical guide to ice blending that compares power, blade design, jar construction, and real‑world performance to help you choose the right blender for crushing ice.

Which blender can blend ice? The top performers are high‑power countertop models with 1000–1200 watts or more, strong stainless blades, and a sturdy, sealed jar designed to handle frozen ingredients. Look for an ice‑crush preset, pulse control, and reliable build quality. In practice, a well‑built, high‑power blender from a trusted brand consistently crushes ice into smooth, uniform texture with minimal chunks.
Why Choosing the Right Blender for Ice Matters
For many home cooks, the ability to turn ice into smooth, slushy, or evenly crushed texture is a practical requirement, not a luxury. When evaluating which blender can blend ice, you’re assessing more than a single feature; you’re weighing motor power, blade geometry, jar design, and system durability. A blender that performs well with frozen fruit or ice cubes often translates into better smoothies, cocktails, and even cold soups. In this section, we’ll outline why ice handling sets apart ordinary blenders from purpose-built appliances, and what it implies for daily kitchen work. We’ll also set expectations about what counts as acceptable ice results in typical kitchen tasks, from crushed ice for margaritas to shaved ice for dessert toppings. By understanding the science behind ice crushing, you’ll be better prepared to compare models without being swayed by marketing buzzwords.
Understanding Ice-Crushing Technology
Ice crushing isn't just about power; it's about how the blender's blades and drive train interact with the hard, brittle structure of ice. Most modern blenders use a combination of sharp stainless steel blades arranged at multiple angles to generate shear forces while the jar's geometry guides ice toward the blades. In practice, the most successful smoothies or crushed ice begin with a robust blade path that traps ice cubes in a controlled way rather than blasting them across the jar. Look for blade designs with 4–6 edges and reinforced hubs that resist bending, especially when the blender runs for extended pulses. In addition, a jam-resistant coupling between motor and blade is a quiet achiever for long sessions. Finally, jar shape matters: taller jars with a slightly conical bottom tend to funnel ice toward the blades more consistently than squat, wide-mouthed jars. The takeaway: ice‑crushing performance comes from a system that combines blade geometry, jar design, and a motor with enough torque to sustain a steady crush cycle.
Motor Power and Blade Design: What Actually Works
Power rating is a helpful shorthand for capability, but it's not the whole story. For reliable ice blending, most experts recommend a motor in the 1000–1200 watt range for countertop units. A higher wattage generally means more torque, which helps in starting the crush and keeping the blades engaged through tougher ice. Yet, torque is only useful if blades can cut effectively; stainless steel blades with multiple edges and a convex edge profile improve cutting action. Blade count matters, but quality matters more: a 4–6 blade assembly with well-welded joints will outperform a 8-blade set that flexes and dulls quickly. We also consider the drive system: heavy-duty couplings and sealed gears reduce vibration and prolong life under repeated ice‑crushing cycles. In contrast, sub‑600 W models tend to stall or struggle with larger ice cubes, producing more inconsistent texture and longer blending times. When you’re evaluating models, use this torque‑power blend as a baseline, then look for durability signals like a robust motor housing and replaceable blades.
Jar Design, Material, and Seal: Influence on Ice Blending
The jar acts as the battlefield where ice meets blade. A well‑designed jar channels ice toward the blades with minimal air pockets that can cause uneven crushing. Glass jars look premium but can be heavy; sturdy BPA‑free plastic with thick walls can be an excellent choice, while polycarbonate is lighter and clear for monitoring texture. The jar’s capacity matters: too small and you’ll overfill quickly; too large and the ice may bounce around, delaying contact with blades. A narrow, tapered bottom helps focus flow, but if the base is too small, you can starve the blades of ice. The lid seal should be tight to prevent splashes and to retain cold temperatures during aggressive cycles. Consider a jar with a splash guard or a ship‑like lip to manage spills. Finally, jar compatibility with accessories matters: look for cross‑brand compatibility or at least easy replacement lids and blades. In short, a solid jar improves reliability and results and reduces mess while you blend.
Blenders by Type: Countertop, Immersion, and Specialty
When choosing a blender to handle ice, it's helpful to distinguish between countertop blenders, immersion blenders, and specialty compact units. Countertop models typically offer the best ice‑crushing performance due to larger motors, more rugged gear trains, and bigger, well‑designed jars. Immersion blenders can crush ice in a pinch, but they often struggle with dense, large ice chunks unless they are exceptionally powerful and designed with an ice‑crush mode. Specialty or personal blenders are convenient for single servings but may compromise on torque or blade geometry. For those who frequently batch‑blend cocktails or smoothies with ice, a full‑size countertop appliance remains the most reliable option. Consider your typical batch size, storage space, and willingness to trade size for power when evaluating options.
Performance Metrics: Power, Speed, and Consistency
Evaluating ice blending performance requires looking beyond wattage. Consider how the blender handles large ice cubes, whether it efficiently reduces to a snow like texture, and how consistent the grind remains across multiple cycles. Key metrics include torque stability (does the motor bog down under load?), blade durability (will blades maintain edge after repeated cycles?), and jar responsiveness (does the jar settle into a uniform blend rather than forming air pockets?). Some models offer ice‑crush presets or timed pulses to standardize results, while others rely on manual speed control. A practical test is to measure texture: crushed ice should be uniform through the cup, not a mix of slush and chunks, and the process should complete within a reasonable time without overheating the motor. The best performers provide predictable results with minimal motor heat buildup, even after several cycles.
Real-World Tests: Crushing Ice Compared
In real kitchens, models that excel on paper may reveal some differences in practice. A top tier countertop blender typically produces a snow‑like texture within 20–30 seconds of continuous operation on high, with uniform particle size and minimal clumping. Mid‑range units often reach similar results but require longer cycles or more frequent pauses to avoid overheating. Entry‑level or immersion units may produce good results for small batches but often stall on large ice cubes or thick ice blends, leaving some chunks visible. The key takeaway from real‑world tests is that motor torque, blade geometry, and jar design cooperate to deliver consistent results. If you run several blends back‑to‑back, the most robust machines tend to maintain performance with less noticeable drop‑off.
Noise, Durability, and Maintenance in Ice Blending
Ice blending is inherently noisy, but build quality can influence perceived loudness and vibration. Look for motors housed in rigid shells with solid mounting to minimize boring rattle and resonance. Vibration dampers and sturdy blade housings also contribute to longer life. Maintenance is straightforward: rinse the jar immediately after use to prevent ice residue buildup, inspect blades for dulling or nicks, and replace gaskets or seals if you notice leaking. A little routine care extends the life of seals, jars, and drive systems. When you plan to blend ice regularly, prioritize models that offer BPA‑free parts, durable seals, and easily replaceable blades. With proper cleaning and periodic part replacement, a high‑power blender can maintain peak performance for many years.
Budget Considerations: Price vs Performance
Price is a practical constraint, but it shouldn’t be the sole determinant of ice‑crushing performance. In general, you’ll find a meaningful performance gap between budget and premium models, especially in torque stability, blade durability, and jar quality. A mid‑range blender may deliver reliable ice crushing for most home needs, with acceptable noise and a reasonable lifecycle. A high‑end model typically offers faster results, longer motor life, and more resilient blades, along with better seals and fewer vibrations during grinding. If you blend ice daily or in larger batches, the cost per year of ownership often justifies investing in the higher end. Conversely, occasional users can often achieve adequate results with a mid‑range unit if they follow best practices like batching and proper ice sizing.
How to Use Your Blender for Best Ice Results
To maximize ice blending quality, start with ice that is roughly the size of a sugar cube. Add a small amount of liquid to help blades engage and avoid air pockets. Use the pulse function to break ice into chunks, then switch to a continuous high‑speed blend until you reach the desired texture. If the blend stalls, pause and add a splash more liquid or adjust the ice-to-liquid ratio. For very dense ice, grind in batches rather than a single long cycle. Keep the jar moderately full to maintain blade contact and avoid overloading the motor. Finally, allow the blender to rest briefly between long cycles to prevent overheating. By controlling batch size, liquid content, and cadence, you’ll consistently achieve smoother ice textures.
Common Pitfalls and How to Avoid Them
Common mistakes include overfilling the jar, using too little liquid, and selecting a model without adequate torque. Another pitfall is neglecting blade and jar condition; dull blades or cracked jars dramatically reduce performance and may risk injury. Always inspect seals, blades, and the jar for signs of wear, and replace worn parts promptly. Finally, avoid relying on pure “ice crush” marketing claims without testing the blend quality yourself. Run short trials with your usual ingredients to confirm that results meet your expectations.
Quick-start Ice-Crushing Recipes That Work
Try a simple crushed‑ice base by combining ice with a splash of water and a handful of frozen fruit. For a refreshing texture, blend 1 cup ice with 1/2 cup frozen mango and 1/4 cup pineapple, plus 2–3 tablespoons water. For a cocktail-friendly crush, blend ice with lime juice and a touch of simple syrup, then strain as needed. If you want a snow‑like texture suitable for smoothies, blend ice with a splash of coconut water and a small banana for body. These starter recipes help you calibrate texture expectations and verify your blender’s ice‑crushing capability before you move on to more complex blends.
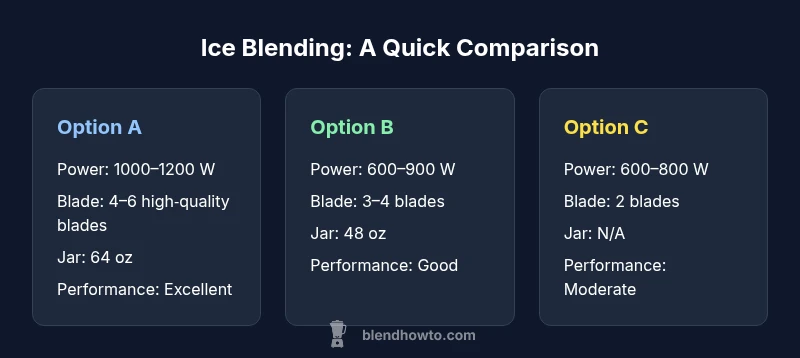
Feature Comparison
| Feature | Option A | Option B | Option C |
|---|---|---|---|
| Power (W) | 1000–1200 W | 600–900 W | 600–800 W |
| Blade Design | 4–6 high‑quality blades, reinforced hub | 3–4 blades, standard design | 2 blades, lower durability |
| Jar Capacity | 64 oz / 1.9 L | 48 oz / 1.4 L | N/A for immersion type |
| Ice-Crushing Performance | Excellent; snow-like texture within 20–30s | Good; works well in batches | Poor; not recommended for dense ice |
| Noise Level | Moderate to High | Moderate | Lower due to smaller motor |
| Ease of Cleaning | Easy; wide mouth, dishwasher safe parts | Moderate; some parts require hand wash | Varies by model; some attachments non‑washable |
| Best For | Frequent ice drinks and frozen desserts | Casual use and small batches | Supplementary tool or occasional use |
What's Good
- High-powered blenders deliver consistent ice texture
- Durable blades and sealed jars improve longevity
- Wide jar options enable batch processing
- Excellent for smoothies, frozen drinks, and cocktails
- Presets and pulse controls simplify operation
The Bad
- Higher upfront cost for premium models
- Noisy operation in many high‑torque units
- Heavy and bulky; less suitable for small kitchens
- Maintenance requires occasional blade/seal replacement
High-power blenders are the best choice for reliable ice blending; they deliver consistent texture with longer-term durability
Choose a high-torque model (1000–1200 W) with a robust blade set and a sturdy, sealed jar. For frequent ice use, this combination yields the most reliable, repeatable results and better long-term value than cheaper, lower-power options.
Frequently Asked Questions
Can any blender blend ice?
Not every blender is suited for ice. Lower‑power models may stall or churn ice into slush, while higher‑torque countertop units handle dense ice more reliably. Always test with your typical ice and ingredient mix.
Not every blender can crush ice well. If you regularly blend ice, choose a model with higher torque and a sturdy blade setup.
What wattage is ideal for ice crushing?
Aim for at least 1000 watts for reliable ice blending; around 1200 watts offers extra headroom for dense ice and longer batches. Power matters, but blade design and jar quality matter even more.
Around a thousand watts is a good baseline; more power helps, but you still want solid blades and a sturdy jar.
Are immersion blenders good for ice?
Immersion blenders can work for light ice tasks, but they typically struggle with dense or large ice chunks. If you need regular ice crushing, a countertop model with a solid ice‑crush profile is preferable.
Immersion blenders aren’t ideal for hard ice; for best results, use a countertop blender with strong ice‑crushing ability.
Should I crush ice in batches?
Yes. Crushing in smaller batches improves texture consistency and reduces motor strain. Rest the motor briefly between cycles to avoid overheating.
Yes—batch blending helps, and give the motor short breaks between cycles to stay cool.
How do I clean a blender after ice blending?
Rinse the jar and blades immediately after use, then run a quick cycle with warm water and a drop of dish soap. Avoid abrasive pads that can scratch blades or jars.
Rinse right away, then run a quick soap cycle to keep your blender clean.
What about noise and durability concerns?
High‑power ice blending is loud, but a well‑built blender with a solid motor housing and quality seals reduces wear and vibration over time. Regular maintenance also helps longevity.
Yes, it’s loud, but a sturdy model lasts longer and stays reliable with proper care.
What to Remember
- Prioritize motor power and blade durability for ice blending
- Jar design and seals influence ice texture and mess reduction
- Batch blending improves texture and reduces motor strain
- Immersion blenders are generally less capable for dense ice
- Regular maintenance extends blade life and performance