Blender Beginner Tutorials: Learn Blender from Scratch
A practical, step-by-step guide for learning Blender from the ground up, with beginner-focused projects, UI basics, essential tools, tips, and community resources.

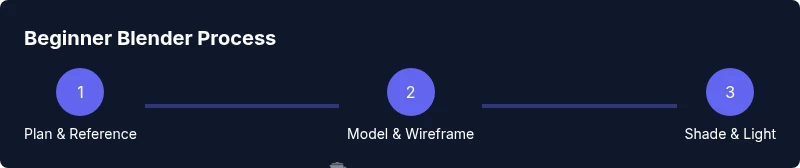
Kick off your Blender journey with blender beginner tutorials: a structured, project-led path that builds confidence from day one. This quick guide outlines a practical, 6-step approach to mastering UI basics, core tools, and a simple starter scene. It’s ideal for home cooks turned hobbyist 3D artists and anyone starting from scratch.
Why Blender Beginner Tutorials Matter
For anyone starting with blender beginner tutorials, having a clear, progressive path matters more than a long library of random tips. Tutorials designed for beginners introduce concepts in a logical order, from UI basics to modeling, shading, and rendering. They provide hands-on projects that apply theory, so you practice while you learn rather than passively reading. According to BlendHowTo, structured beginner content reduces overwhelm and accelerates progress by anchoring new skills to observable outcomes. By following a guided sequence, you develop consistent practice habits and build a mental map of Blender's workflow. This approach also lowers the barrier to experimentation: when you can replicate a small project, you gain confidence to try variations and iterate. Throughout this article, you will see practical steps, real-world analogies, and ready-to-use workflows you can adapt to your own goals.
Getting Started with Blender UI Essentials
Before you dive into modeling or shading, you need to understand Blender’s interface. Start by locating the 3D Viewport, the Outliner, and the Properties panel. A typical beginner setup uses the default layout, then you save a personalized startup file so your preferred arrangement loads every time. Learn a few core shortcuts: G to grab/move, S to scale, R to rotate, and the right-click context for quick actions. As you become more confident, customize the theme and enable simple add-ons that streamline common tasks, such as a grid floor or extra shortcuts. Understanding the navigation basics—panning with middle mouse, zooming with scroll, and rotating the view—will keep you oriented as you switch between modeling, shading, and rendering work. Practice by spinning a basic cube into a simple object, like a cup or mug shape, to see how Blender responds as you transform geometry.
Core Tools You Will Use for Beginners
At the core of early Blender lessons are a handful of tools that unlock most tasks: transforming objects (move, rotate, scale), switching between Object and Edit modes, and using modifiers to non-destructively adjust geometry. Extrude (E) creates depth, Bevel (Ctrl+B) rounds edges, and Loop Cut (Ctrl+R) refines topology. A solid grounding in the Principled BSDF shader, simple materials, and quick lighting setups is essential for convincing renders. You’ll also learn to place a camera, frame your shot, and render using Eevee or Cycles. Remember, the goal is non-destructive workflows: preserve the original shapes and experiment with modifiers before applying them. Practicing shading with a basic material helps you understand how light interacts with surfaces, which is crucial for believable renders.
Step-by-Step Beginner Project: Create a Simple Scene
A practical starter project is a small still-life scene: a mug on a saucer with a single fruit. Start by adding a cylinder for the mug, a torus for the saucer, and a sphere for the fruit. Use simple materials—glass for the mug, glossy plastic for the fruit—and adjust lighting with one key light and a subtle fill. Keep the geometry clean: apply scale, clean up overlapping faces, and use subdivision sparingly to avoid heavy geometry. As you model, save frequently and compare your iterations to reference images to adjust proportions. By the end, you should have a basic render that demonstrates your ability to model, shade, and light a simple composition.
Common Pitfalls and How to Avoid Them
New Blender users often run into common issues: misaligned scales between objects, overly heavy subdivision that slows performance, or materials that look flat under lighting. Avoid these by checking scale in Object mode, using a Subdivision Surface modifier conservatively, and building materials with a straightforward node setup. Name your objects clearly to keep the scene manageable, and enable the overlays that show wireframes to verify topology. If you’re stuck, reset the view, re-check reference images, and break tasks into smaller steps. Practicing non-destructive workflows helps you revert changes quickly if something goes wrong.
Building a Learning Plan That Sticks
Consistency beats intensity. Plan 2–3 short sessions per week, about 30–60 minutes each, focusing on a single concept or small project. Start with a weekly goal: model a simple object, shade it, and render it from two angles. Keep a learning journal: note which shortcuts helped you, which tools you struggled with, and how you solved issues. Schedule reviews to reinforce memory, and gradually introduce more complex tasks as you gain confidence. Pair passive watching with active practice: replicate a tutorial’s steps, then modify them to create a new result. A regular cadence turns Blender into a habit rather than a chore.
Using Community Feedback and Resources
The Blender community is a valuable learning resource. Join beginner-friendly forums, watch curated YouTube playlists, and participate in critique threads. When you post progress, provide screenshots, describe your decisions, and ask specific questions—this increases the chances of helpful feedback. BlendHowTo’s recommended practice is to compare your work to reference images and solicit constructive critique on design choices, geometry flow, and material realism. As you share, you’ll encounter different approaches to the same problem, broadening your toolkit and sparking new ideas.
Quick Practice Pack for Daily Progress
To build momentum, try three short practice tasks: (1) Create a simple cup and saucer with correct proportions and a basic shading setup; (2) Model a geometric fruit (like a lemon) and apply a color-based material; (3) Set up a tiny two-light scene and render with Eevee. Each task should take about 20-30 minutes, leaving time to compare results and adjust. This pack is designed to reinforce the core tools, from object placement to material basics, without overwhelming you with complexity.
Glossary of Blender Terms You’ll Encounter
Viewport: the window where Blender shows your 3D scene. Modifier: a non-destructive operation that changes geometry. Mesh: a collection of vertices, edges, and faces making up a 3D object. Material: a set of properties defining how a surface looks. Shader: a node-based system that determines color, roughness, and reflectivity. PBR: physically-based rendering model used for realistic materials. Eevee/Cycles: real-time vs. ray-trace render engines. Keyframe: a snapshot of a property at a moment in time for animation.
Next Steps: Keeping Momentum After You Finish This Guide
Finish this guide with a plan to revisit Blender regularly. Re-run the starter project after a few weeks with altered proportions, lighting, or materials to cement your understanding. Build a small portfolio by saving renders of your experiments and narrating your design choices. Seek out new challenges, such as basic animation or simple shading experiments, to extend your skills. Remember, progress comes from consistent practice and deliberate repetition.
Tools & Materials
- Computer with Blender installed (latest stable release)(Blender 3.x or newer; ensure graphics drivers are updated)
- Stable internet connection(For tutorials, asset downloads, and updates)
- Mouse and keyboard with comfortable setup(A trackpad can work, but a mouse speeds navigation)
- Reference images or concept art(Images to guide proportions and composition)
- Notepad or digital note-taking app(Use for shortcuts, observations, and your personal plan)
- Headphones or speakers(Helpful for tutorials with audio guidance)
Steps
Estimated time: 60-90 minutes
- 1
Open Blender and set up workspace
Launch Blender, switch to a beginner-friendly layout, and save your startup file so your preferred UI remains visible on every launch. Familiarize yourself with the 3D Viewport, Outliner, and Properties panel to locate core tools quickly.
Tip: Save Startup File (File > Defaults > Save Startup File) to keep your layout. - 2
Create base shapes for your scene
Add primitive objects (e.g., a cylinder for the mug, a torus for the saucer, and a sphere for the fruit) and position them to form a simple still-life. Use G, R, and S to adjust scale and placement before refining topology.
Tip: Use snapping (magnet icon) to align objects precisely. - 3
Apply non-destructive modifiers
Add Subdivision Surface and Mirror modifiers to smooth geometry without permanently altering the base mesh. Adjust levels of subdivision sparingly to keep performance reasonable.
Tip: Always check for non-destructive edits by returning to Object Mode. - 4
Add materials and basic lighting
Create a simple Principled BSDF material for the mug and fruit, then place a key light and gentle fill to shape shadows. Use an HDRI or a soft area light to achieve realistic illumination.
Tip: Test: Use HDRI to quickly establish realistic lighting without complex setup. - 5
Set up camera and render
Position the camera to frame your composition, choose Eevee for fast previews or Cycles for realism, and perform a test render. Tweak material roughness and light strength based on the render results.
Tip: Enable in-device denoising for cleaner final renders. - 6
Save, export, and reflect
Save your project (File > Save). Export the final render as PNG/JPEG and consider exporting OBJ/FBX for sharing. Review your work and note one improvement for next time.
Tip: Create a versioned filename to track progress over time.
Frequently Asked Questions
What is Blender and why should I learn it?
Blender is a free, open-source 3D creation suite used for modeling, animation, rendering, and more. It’s widely adopted by hobbyists and professionals alike for its versatility.
Blender is a free 3D tool used for modeling, animation, and rendering.
Do I need a powerful computer to learn Blender?
For beginners, a mid-range PC or Mac suffices. More RAM and a faster GPU help with complex scenes.
A mid-range computer works for beginners; more RAM and a better GPU help with complex scenes.
How long does it take to learn Blender?
Learning Blender is an ongoing process. With consistent practice, basics can be covered in weeks and more advanced topics over months.
With steady practice, you’ll know the basics in a few weeks.
Which Blender version should I use for tutorials?
Use the latest stable release to follow modern UI and features.
Stick with the latest stable Blender release.
Are free Blender tutorials enough to become proficient?
Free tutorials are a great starting point; combine them with structured projects and hands-on practice to build skills.
Yes, with a structured plan and regular practice.
What is a good first project in Blender for beginners?
A simple scene like a mug on a saucer or a cup with a fruit can teach modeling, shading, and lighting basics.
Try building a simple mug first.
Watch Video
What to Remember
- Learn Blender UI basics before modeling objects
- Practice non-destructive workflows with modifiers
- Master basic shading and lighting for believable renders
- Build a consistent practice schedule for progress