Best Way to Load Blender for Smoothies: A Practical Guide
Discover the best way to load blender for smoothies with a proven ingredient order, texture tips, and cleanup strategies. Learn how to layer liquids, fruits, greens, and ice for creamy, consistent blends every time.

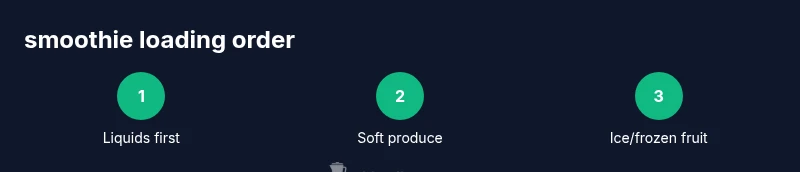
By the end you’ll know the best loading order for smoothies, including how to balance liquids, fruits, and solids for a creamy texture. Start with liquid, then soft produce, then frozen ingredients or ice, and finish with a quick pulse. Use evenly sized pieces and moderate speeds to avoid air pockets and splatter for a smooth blend.
What loading a blender for smoothies means
Smoothies hinge on how you load ingredients, not just what you blend. The order you place items in the container influences blade engagement, air intake, and texture. If you’re aiming for the best way to load blender for smoothies, think of your pitcher as a stage where liquids lead, soft produce follows, and frozen components close the act. According to BlendHowTo, a deliberate loading order minimizes clogging, reduces the need for high power, and delivers a creamier result with less foam. When you load ingredients in the right sequence, you’ll notice smoother emulsions, better flavor distribution, and less need to stop and scrape the sides mid-blend. In practice, you’ll start with a liquid, add softer produce, layer in any powders or add-ins, and cap it with ice or frozen fruit. This approach helps you control thickness and prevents your blender from stalling during the blend. The outcome is a consistent texture across servings and fewer awkward chunks that ruin the mouthfeel. Use the first block of this article as a mental blueprint for building your smoothies every time.
Core factors: ice, fruit, and texture
Texture is the heart of a great smoothie, and the loading order directly affects it. Ice provides body and a chill that helps the blades cut through dense fruit, while frozen fruit adds creaminess without watering down flavor. Soft fruit, leafy greens, and yogurt or dairy alternatives introduce moisture and balance. The best way to load blender for smoothies acknowledges that too much ice or overly large chunks can create a gritty, icy texture, whereas too little ice may yield a thin, watery drink. Temperature matters too: starting with cold liquids minimizes heat buildup as the blades spin, preserving flavor and nutrients. Consider the density of each ingredient: liquids sit at the bottom, soft items float above, and hard, frozen components cap the top. This stacking minimizes suction on the blades and reduces the need to scrape during blending. A well-arranged load makes a more even blend with fewer stops, saves time, and produces a smoother final product with less air whip.
Ingredient prep for best texture
Preparation is the secret sauce behind reliable smoothies. Wash produce thoroughly, trim stems, and cut everything into uniform chunks (roughly 1–2 inches). This ensures even blade contact and reduces the chance of large, unblended bits. For dairy-based bases, weigh your liquids to hit an optimal blend height; for dairy-free options, measure plant-based milks and add-ins to achieve the same effect. Remove tough seeds from mangoes or stone fruits if you’re sensitive to pithy textures. If you’re new to blending, start with a simple combination (liquid + soft fruit + ice) and then layer in greens or protein powders gradually. Keeping a consistent mise en place—prepped ingredients, measured liquids, and a clean blender—dramatically improves your speed and results. BlendHowTo observations suggest that consistent prep reduces blending time and yields more predictable texture across batches.
Layering order and blending times
To master how to load blender for smoothies, follow a deliberate layering sequence and adjust blending time based on density. Start with liquids to establish a circulating base, then add soft fruit (bananas, berries, yogurt), followed by greens or powders, and finish with ice or frozen fruit to deliver thickness. Begin with short pulses to break up larger pieces, then move to a steady, medium speed until the mixture looks uniform. If your blender struggles, stop and scrape the sides, reintroduce liquid if needed, and resume blending. This approach minimizes air pockets and helps flavors emulsify evenly, resulting in a creamy mouthfeel. For high-speed models, a 30–60 second blend at medium speed often suffices; then switch to a quick pulse to polish any remaining lumps. The key is to avoid forcing all ingredients into the blades at once, which can overload the motor and degrade texture.
Protein and add-ins: how to balance
Proteins, greens, seeds, and nut butters can transform a smoothie from a snack to a meal. Add powders or paste after liquids and soft produce to help them dissolve more readily rather than sticking to the sides of the container. If you’re adding oats, chia seeds, or flaxseed, pre-soak or grind them for better dispersion. Nut butters should be added in small amounts to prevent clumping. Greens such as spinach or kale blend easily when they’re placed on top of liquids. Taste and texture are influenced by how you load these ingredients; a little planning prevents gritty layers and uneven flavor. The best way to load blender for smoothies is to blend in stages, testing texture after each add-in to maintain the desired creaminess.
Clean-up and maintenance after a smoothie session
Cleaning promptly protects blade sharpness and flavor integrity for future blends. Rinse the blender jar with warm water immediately after use, then add a splash of dish soap and run on a short cycle to loosen residue. For stubborn stains or odors from berries or greens, scrub with a non-abrasive sponge and rinse thoroughly. Dry all removable parts before reassembling to prevent mold. Regularly inspecting the gasket and blade assembly helps you catch wear early. A quick post-blend rinse is a simple habit that pays off in longer appliance life and more consistent smoothies over time.
Common mistakes and how to avoid them
Common mistakes include overfilling, using too much ice, or skipping prep steps. Overfilling creates spillage and overloads the motor; always respect the max fill line. Large chunks take longer to break down, so cut produce evenly. Skipping liquids leads to air pockets that hamper blending; always start with liquid. Rushing through steps or using too high a speed at the start can cause splatter; begin with gentle pulses and progress to steady blending. If you notice uneven texture, stop, scrape the sides, and add a splash of liquid rather than forcing more time at maximum speed. Finally, don’t ignore the need for cleaning; a quick rinse after each use prevents stubborn staining and preserves flavor.
Quick-start template: build your own smoothie blend
If you want a fast, reliable template, think of the load as three layers: base (liquid + soft fruit), core (greens, protein, or powders), and top (frozen fruit or ice). For example: 1 cup almond milk, 1 banana, a handful of spinach, 1 scoop protein powder, 1 cup frozen berries. This structure translates into countless variations while maintaining texture. Use this blueprint to experiment with your favorite flavors and adjust the liquid amount to hit the ideal thickness. As you gain experience, you’ll intuitively know when a splash more liquid or another handful of frozen fruit is needed to achieve the perfect smooth consistency.
Tools & Materials
- Blender (with lid)(Secure lid; avoid overfilling beyond max line)
- Fresh fruit (washed, chopped)(Use bite-sized pieces 1–2 inches)
- Frozen fruit or ice(1–2 cups depending on desired thickness)
- Liquid base (water, milk, or juice)(Add enough to reach blend height)
- Measuring cups/spoons(For portions and add-ins)
- Spatula or spoon(Scrape sides mid-blend)
- Tamper (optional)(Only for high-speed or very thick blends)
- Protein powder/greens/nut butter/seeds (optional)(Add-ins for nutrition; adjust liquid accordingly)
Steps
Estimated time: 15-25 minutes
- 1
Prepare ingredients
Wash produce, trim stems, and cut into uniform chunks (1–2 inches). Pre-measure liquids and have add-ins ready. This ensures even blending and predictable texture.
Tip: Uniform pieces reduce blade resistance and speed up blending. - 2
Add liquids first
Pour liquid base into the blender before solids. This creates a natural vortex that pulls ingredients toward the blades and helps prevent air pockets.
Tip: Starting with liquid minimizes spatter during the initial pulse. - 3
Layer ingredients by density
Place soft produce and greens next, followed by powders or add-ins, and finish with ice or frozen fruit on top. This arrangement keeps blades engaged and promotes even texture.
Tip: Heavier items at the bottom prevent floating clumps. - 4
Pulse and start blending
Use 1–2 second pulses to break large pieces, then blend at a steady medium speed until smooth. Short bursts reduce foam and heat buildup.
Tip: Pause briefly between bursts if the machine gets warm. - 5
Check texture and adjust
If the blend is too thick, add a splash of liquid and blend briefly. If too thin, add a bit more frozen fruit or ice and blend again.
Tip: Tasting mid-blend helps you tune sweetness and acidity. - 6
Serve and clean
Pour into glasses and rinse the jar immediately. Wash blades with warm soapy water, then dry thoroughly before next use.
Tip: A quick rinse prevents staining and lingering flavors.
Frequently Asked Questions
What order should I load ingredients into a blender for smoothies?
Always start with liquids, then soft produce, followed by powders or add-ins, and finish with ice or frozen fruit. This helps blades engage smoothly and minimizes air pockets.
Start with liquids, then soft produce, add-ins, and finish with ice for the best blend.
Should I use ice or frozen fruit to thicken a smoothie?
Both can thicken, but frozen fruit generally yields a creamier texture without watering down flavor. Use ice sparingly to avoid a slushy result.
Frozen fruit makes it creamier; use ice sparingly if you need a bit more chill.
Can I blend hot ingredients in a blender?
Blending hot ingredients can pressurize the vessel; let them cool slightly first or use a blender with vented lids. Always exercise caution.
Let hot ingredients cool a bit before blending to avoid pressure buildup.
How do I clean a blender after smoothies?
Rinse, add warm water and a drop of dish soap, and run briefly. Rinse again and dry thoroughly to prevent odor and staining.
Rinse, soap, blend briefly, rinse again, and dry.
What texture should a smoothie have?
A creamy, pourable texture is ideal. Adjust thickness with liquids or frozen fruit to reach your preferred consistency.
Aim for a creamy, pourable texture and tweak with liquid or ice as needed.
Is a tamper necessary for thick blends?
Not always. Many blenders blend thick blends without a tamper; use a spatula to push ingredients toward the blades if needed.
A tamper helps in some machines, but you can blend thick blends without it.
Watch Video
What to Remember
- Pour liquids first to prevent air pockets
- Layer ingredients by density for even blending
- Use frozen fruit to achieve creaminess
- Adjust thickness with liquids or ice
- Clean promptly to avoid stains and odors